Intro
Ever since I learned about the existence of VoIP phones during my time in the Cisco Networking Academy, I’ve always wondered how they work and how to set them up. This post follows my experience setting up two Cisco 7945G phones I acquired off eBay with the open-source FreePBX software. I set these phones up to use the SIP protocol to register with the FreePBX server so that I could make calls locally (between the two phones themselves) as well as outbound calls to external numbers. To establish outbound calls to the Public Switched Telephone Network (PSTN), I used Twilio. Once everything was configured properly, I could use one of the 7945G phones to call my cell phone and vice versa.
I hope this post serves as both an interesting story and somewhat of a guide to those who want to do something similar. There are several Note sections containing important information. If you are using this post as a guide, I strongly encourage you to examine those sections. Although this project uses 7945 IP phones, FreePBX 17, and Twilio, certain concepts here can be applied to different situations. For example, I used the knowledge I gained here when working with a 7941 IP phone.
The sources used in this project for are referenced at the end so if you want more information, feel free to check those out.
Technical Definitions
Below are the definitions of some of the general concepts mentioned throughout the project and the purpose of the concept if it is relevant. This will hopefully allow you to get a better understanding of what is happening. These terms are in alphabetical order. Each term is a link to further reading if you are interested.
- Cisco is a well-respected, multinational technology company offering software, network, and cybersecurity solutions.
- Debian 12 is a Linux operating system that is officially supported by the FreePBX project which is why I chose this one.
- DHCP (Dynamic Host Configuration Protocol) is a widely used protocol that automatically assigns IP addresses to devices that request one based on a pool of available addresses. DHCP is useful in cases where the IP address of a device doesn’t need to stay the same.
- Firmware, in terms of a Cisco IP phone, is the software that runs the phone. It’s the software that makes SIP requests in the registration process. It’s also the software that loads the wallpaper image. Firmware for the 7945G phones are designed for either SIP or SCCP (a Cisco proprietary protocol that isn’t relevant for this project). Since FreePBX works better with SIP, that’s the type of firmware I acquired.
- FreePBX is a popular, open-source PBX (Private Branch Exchange) solution. Given the large amount of tutorials and guides online, it’s a great choice for a project like this.
- Two devices on a LAN (Local Area Network) are on the same computer network meaning they don’t need the internet to talk to each other. As long as the power is on, they can communicate.
- A MAC address or media access control address is a physical, unique identifier assigned to every network interface (like an IP phone’s Ethernet port). Because it is unique, the configuration file unique to each phone in this project must be named using the phone’s MAC address:
SEP<MAC>.cnf.xmlwhere<MAC>is replaced with the MAC address. - Proxmox is a virtualization platform that is capable of running multiple VMs. Proxmox is installed directly onto a machine’s hardware (no OS above it) and can allocate resources to the VMs created using its web interface.
- PSTN (Public Switched Telephone Network) is the “aggregate of the world’s telephone networks” that enables voice communication to take place around the world. Connecting to the PSTN means being able to make and receive calls from the rest of the world.
- SIP (Session Initiation Protocol) is used for establishing, maintaining, and terminating voice connections among other things. It uses port 5060.
- TFTP (Trivial File Transfer Protocol) is a simple protocol that can be used to transfer files between two computers. It’s perfect for “network booting” where devices rely on files on a TFTP server in order to be able to boot.
- Twilio, in my case, is a VoIP service provider that I used to connect to the PSTN in order to place outbound calls. Twilio is a paid service (pay by the minute) but I wasn’t spending a lot of time talking with external numbers. The setup process for Twilio is fairly simple with the most difficult part being the setup for SIP authentication and the configuration of the entry point into your PBX infrastructure (inbound calls need a path to the SIP server to reach the registered IP phones).
- A VM (Virtual Machine) is an emulation of an operating system within another operating system. This means that you could have one server with multiple “computers” within it, some could be Linux and others could be Windows.
- A 7945G VoIP Phone is one of Cisco’s VoIP phones. It’s an older model but it has enough functionality for this project.
Early Planning
9/26/2024
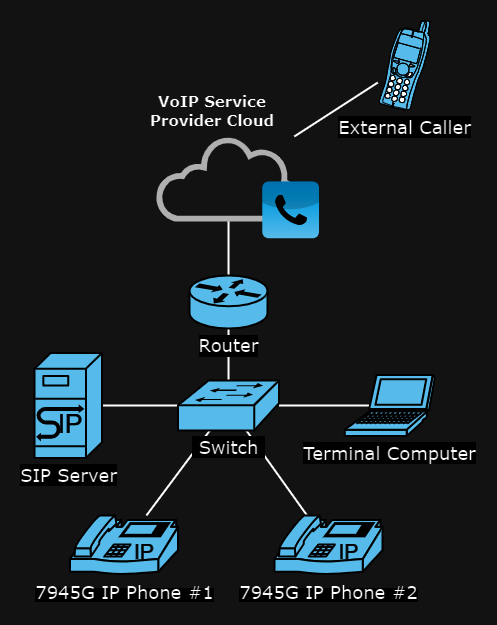
The above diagram is what I wanted the final network to look like. The lines connecting the devices together represent an Ethernet connection. The table below describes each element of the network in detail, starting from the top.
| Element | Description |
| External Caller | This phone represents any phone outside the network that wants to establish an inbound call. |
| VoIP Service Provider Cloud | I didn’t know it at the time but this represents Twilio’s network infrastructure. This cloud enables my PBX network to make and receive external calls. |
| Router | A router is a device that interconnects networks together. In this case, it represents a connection between my LAN network and the internet (more specifically, the Twilio cloud). |
| SIP Server | This server runs the FreePBX software along with other important services such as DHCP and TFTP for the SIP registration process. The server runs on a Debian 12 virtual machine which itself runs on Proxmox. |
| Switch | A switch is a device that interconnects devices on the same network (LAN). Here, it’s used to create the foundation of the PBX network by putting the SIP server and IP phones on the same network. |
| Terminal Computer | This represents the laptop which I used to manage every component of the network. |
| Cisco VoIP Phones #1 and #2 | These are the phones that will eventually be registered with the SIP server and be able to make calls with each other and to external phone numbers. |
Note
In order to upload custom firmware to these phones, they need to be on a network that has a DHCP server as well as a TFTP server. The DHCP server will give the phones their IP address and the TFTP server will give the phones their firmware based on their MAC address (this should be physically written on the phones somewhere). When the phones connect to the TFTP server, they will look for a file named SEP<MAC>.cnf.xml where “<MAC>” is replaced with the phone’s MAC address. Each phone must have their own configuration file on the TFTP server.
Initial Setup With Problems
9/27/2024
When I got the two phones, one of them already had firmware installed and was attempting to register with an already-configured Unified CM while the other was stuck on an “Updating” screen. I initially thought that the second phone was unusable for my purposes. Ironically, that phone ended up being the first to register with my SIP server.
I tried to perform a factory reset on the second phone by following these steps:
- Disconnect the phone from power
- Reconnect the phone and hold the # key while it boots
- When the line buttons start flashing amber, release the # key
- Enter 123456789*0# into the phone
That unfortunately did nothing and I put the phones aside to focus on the SIP server.
Installing FreePBX 17
According to the FreePBX wiki, here is what you have to run to install FreePBX:
cd /tmp
wget https://github.com/FreePBX/sng_freepbx_debian_install/raw/master/sng_freepbx_debian_install.sh -O /tmp/sng_freepbx_debian_install.sh
bash /tmp/sng_freepbx_debian_install.sh
After I had run these commands, I was able to access the FreePBX management interface by entering http://<FREEPBX_SERVER_IP> into my browser.
Configuring FreePBX 17
In order for a phone to register on FreePBX, it needs an account. This is where extensions come into play. An extension is a short number (4 digits in my configuration) assigned to a VoIP phone that allows it to be dialed by another phone. To quickly configure extensions on FreePBX, go to Connectivity > Extensions > Quick Create Extensions. Below are the details on the relevant settings for both pages of the quick create menu.
Step 1 Page
| Variable | Description |
| Extension Type | Select chan_pjsip as chan_sip is deprecated. |
| Extension Number | This is what other phones would use to dial the current phone. Use a 3-5 digit number and don’t begin with 1 to avoid overlapping with existing services. |
| Display Name | The person who owns this extension. |
Step 2 Page
| Variable | Description |
| Enable Voicemail | The toggle for voicemail. |
| Voicemail PIN | The password used to access an extension’s messages after dialing *98 (voicemail service). |
Note
When I was having trouble getting the phone to register with the SIP server, I was getting a 401 Authorization error from the SIP server (according to the phone’s logs). I had <authPassword> in the SEP<MAC> file set to the same password I would use to login into the user account on FreePBX. I fixed this issue by setting Connectivity > Extensions > Edit Extension > General > Secret to the same password I was using to login to the user account. I did try taking the already-existing secret and putting that into SEP<MAC> but that didn’t work for me so I changed the secret.
TFTP Server
9/30/2024
The TFTP server is a vital part of configuring the VoIP phones. This is what they use to obtain everything from firmware to wallpaper images. In my case, the files were being served from the /tftpboot directory. This means that everything that must be reached by a phone has to be within that directory.
A simple way to check if a file is accessible on the LAN is to run the following command on a different computer in the same LAN: tftp <IP> get <FILE> which will attempt to connect to the server over TFTP and download the specified file.
Overview of Files Required
Configuration Files
dialplan.xml (Dialing Configuration)
SEP<MAC>.cnf.xml (Phone-Specific Configuration)

Firmware Files (.loads and .sbn files)
apps45.9-2-1TH1-13.sbn
cnu45.9-2-1TH1-13.sbn
cvm45sip.9-2-1TH1-13.sbn
dsp45.9-2-1TH1-13.sbn
jar45sip.9-2-1TH1-13.sbn
SIP45.9-2-1S.loads
term45.default.loads

The above firmware files are for version 9.2.1, which was the version I picked to upload to the phones. Files for other firmware versions for the 7945 will begin the filenames the same way: "apps45", "cnu45", etc. The file "term45.default.loads" should have the same name across different firmware but different contents.
These files can be found online but since phones like these are pretty old, it can be tricky. Fortunately, the cisco_prov GitHub repository contains a lot of what you would need to setup a Cisco VoIP phone. Another source of firmware files is firewall.cx.
The most notable file here is the SEP<MAC>.cnf.xml file. Most of the troubleshooting I did led me back to this file. It’s the phone-specific configuration file that tells the phone where it can find the SIP server as well as where it can find configuration files on the TFTP server. This file also allows you to define different settings on the phone such as the format of the date display (M/D/Y) among many other things.
Firmware Downloaded
10/1/2024
After uploading the necessary files to the TFTP server, I was able to get the phone stuck on “Updating” to download the SIP firmware files. Don’t forget to specify the proper firmware file in the <loadInformation> tag of the SEP<MAC> file. In my case, I had it set to SIP45.9-2-1S.loads.
Note
I thought that I would need to set DHCP option 66 (to specify a TFTP server IP address) so that my phones would be able to locate the TFTP server but my SIP server was also running a DHCP server on the same network (dnsmasq) and Cisco IP phones like these seem to default to using the IP address of the DHCP server as their TFTP server IP address. Because of this, I didn’t need to set the option. Much later (after this project), when downloading firmware onto a Cisco 7941 IP Phone, I discovered that I needed to set DHCP option 150 (same purpose as option 66) on my Cisco 1941 router in order for the phone to discover the TFTP server on my lab network. With all that being said, make sure to consider where your phones think the TFTP server is.
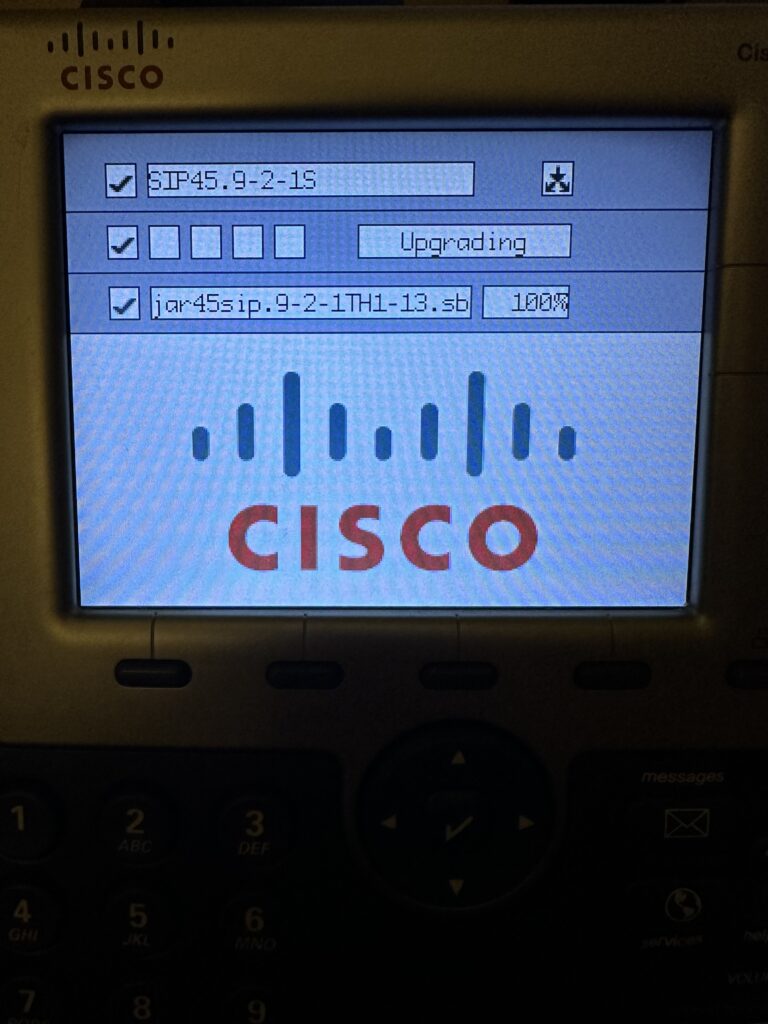
This is what the phone looked like during the firmware download process. When I saw this screen pop up on the phone, I was overjoyed. I knew that this was a step in the right direction. I was starting to lose hope of ever being able to use this seemingly “bricked” phone. Luckily, I was able to set up TFTP correctly.
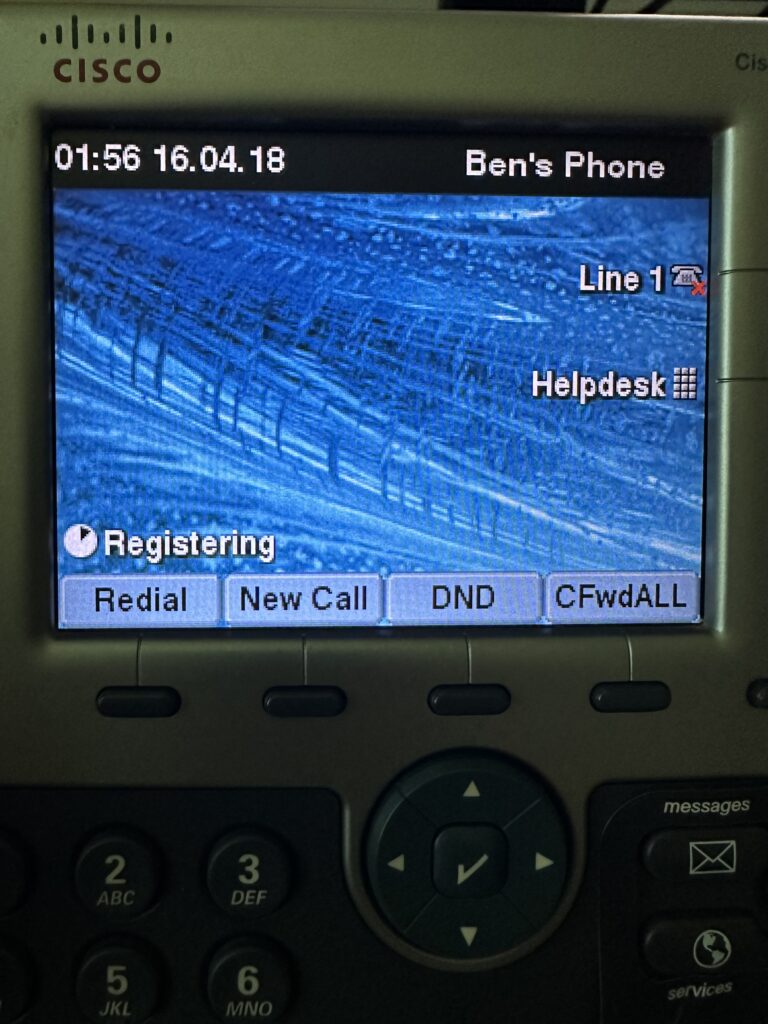
This photo shows my phone just after having new firmware installed. As you can see, Line 1 has a red X and the phone displays “Registering” to indicate that it has not been able to register with the SIP server.
Troubleshooting
10/2/2024 – 10/4/2024
Below are the key changes I implemented in order to get the phone to register with the SIP server. The most notable change was changing the value within the <proxy> tag in SEP<MAC> to USECALLMANAGER. I believe this tells the phone to consult its <callManager> configuration (within the same file) to get the IP address of the SIP server.
SEP<MAC>.cnf.xml
- Removed
<name>from<callManager> - Set
<processNodeName>under<callManager>to my SIP server’s IP address - Set
<natEnabled>tofalse - Set
<proxy>toUSECALLMANAGER
Extension > Advanced
- Set Rewrite Contact to No
- Set Force rport to No
Registered
10/5/2024
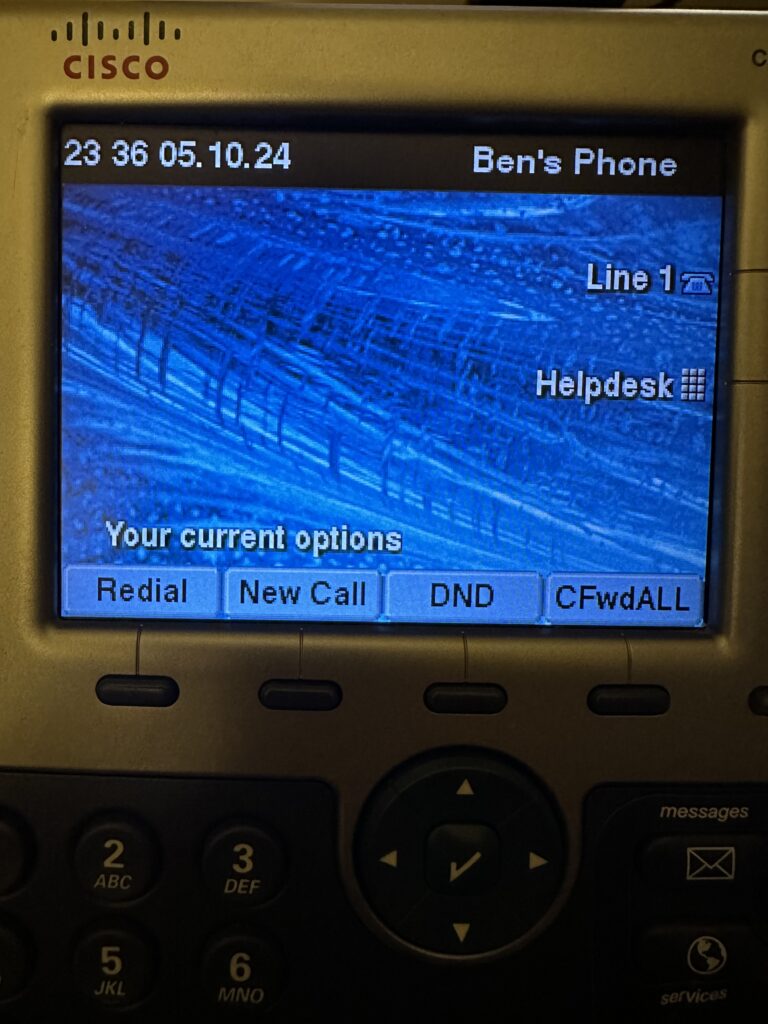
After a considerable amount of troubleshooting, I was finally able to get the phone to register. The photo shows what the phone looked like just after registering. As you can tell, the red X on Line 1 is gone. At this point, I was able to use the phone to call itself. I wasn’t able to pick up the call but I was able to leave a message for myself. I could then play that message back by accessing my voicemail messages by calling *98 (FreePBX voicemail service), entering my extension and voicemail PIN, and selecting 1 for new messages.
In terms of functionality, this phone was ready to make and receive calls on the LAN. I moved on to setting up the second phone to run the same firmware by creating another SEP<MAC>.cnf.xml file for the second phone. I also created another account on FreePBX. After doing that, I booted up the second phone but disappointingly found that the second phone was perfectly fine with the firmware it already had. I decided a factory reset was the most straight-forward solution so I went through the factory reset steps. That fixed the issue. Since the phone had no firmware, it was forced to go look for a TFTP server. Soon, I had two phones registered with FreePBX.
Local Call Established
10/6/2024
I was able to establish a call between the two phones however, the handset on the other phone only had the microphone part working meaning that I couldn’t hear anything unless I put the phone on speaker mode. I know that this was the case because I couldn’t hear the dial tone on the handset when holding it next to my ear until I swapped it with the handset on the other phone. I ordered a replacement handset on Amazon.
Uploading Custom Wallpapers
Usecallmanager.nz is the resource I used to note the wallpaper requirements for 7945 phones. A Desktops/320x212x16 directory needs to exist on the TFTP server. That directory should contain a file called List.xml that acts as a listing of the available wallpapers on the TFTP server.
The List.xml should follow the format shown in the code snippet below where image.png is the actual wallpaper image of size 320x212px and preview.png is the preview image of size 80x53px shown in the background image selection menu.
<CiscoIPPhoneImageList>
	<ImageItem Image="TFTP:Desktops/320x212x16/preview.png" URL="TFTP:Desktops/320x212x16/image.png" />
</CiscoIPPhoneImageList>NoteList.xml can have a maximum of 50 entries and both images must be in PNG format.
Uploading Custom Ringtones
The process for uploading custom ringtones is similar to uploading custom wallpapers in that there needs to be an xml file listing out every item. In this case it’s ringlist.xml. According to usecallmanager.nz, the format should look like the code snippet below where NAME is the display name of the ringtone in the selection menu of the phone and FILENAME.raw is the name of the ringtone file. Both the list file and the ringtone files must be located in the root of the TFTP server.
<CiscoIPPhoneRingList>
	<Ring>
		<DisplayName>NAME</DisplayName>
		<FileName>FILENAME.raw</FileName>
	</Ring>
</CiscoIPPhoneRingList>Noteringlist.xml can also have a maximum of 50 entries and the files must be either a .raw or a .rwb file.
Creating SIP Trunks
10/7/2024
After successfully making a local call between the phones and customizing them a little, I began to focus on getting outbound and inbound calls to work. The first step was to configure SIP trunks which are essentially connections between PBX infrastructure (my SIP server) and an VoIP service provider (Twilio). I needed to configure an outbound trunk and an inbound trunk for this to work. This required configuration on both Twilio and FreePBX. Twilio actually has a guide for configuring SIP trunks with FreePBX that was helpful.
Twilio Trunk Configuration
My Twilio configuration was fairly simple. For the termination configuration (for outbound traffic to the PSTN), I created a custom termination URI (web address) ending in .pstn.twilio.com which FreePBX would use to make outbound calls. I also created some credentials that my FreePBX server would need to authenticate to Twilio. For the origination configuration (incoming traffic to my server), I had to define an IP address which would be the “entry point” into my infrastructure. That was all I needed to configure on Twilio. The termination URI and credentials would have to be configured on FreePBX next.
Outbound and Inbound Trunks on FreePBX
To start configuring an outbound trunk, I went to Connectivity > Trunks > Add Trunk. On the General page, I named the trunk and added the Outbound CallerID which is the phone number I received from Twilio. On the pjsip Settings tab, I entered the credentials I configured in the Twilio termination configuration, set Authentication to Outbound, Registration to Send, and SIP Server to the termination URI I created on Twilio. The inbound trunk followed a similar configuration to the outbound trunk since both have similar settings.
Inbound and Outbound Routes on FreePBX
The trunks are pretty much useless without any routes configured since the routes are what use the trunks.
Configuring the inbound route was simple. I wanted all traffic to go to only one of my extensions. I went to Connectivity > Inbound Routes > Add Inbound Route. I set the destination to Extensions and selected the extension I wanted the traffic to go to.
To configure an outbound route, I went to Connectivity > Outbound Routes > Add Outbound Route. On Route Settings, I gave the route a name and added the Route CID which is the Twilio phone number. I also linked the outbound trunk to the outbound route by adding it to Trunk Sequence for Matched Routes. Below are what my dial patterns looked like on the Dial Patterns tab.
( )    [+1NXXNXXXXXX]
(+1)   [NXXNXXXXXX]
(1855) [NXXXXXX]
( )    []

The () represents a prepend and [] represents a match pattern.
Note
The +1 was important to implement because Twilio wanted a number formatted in E.164 format which meant that it needed to have the country code, +1 in this case. I was getting the 32101 error on Twilio stating the “called number is not correctly formatted” and it was suggesting that I format the number in E.164 format which ended up fixing the problem.
Outbound Call Established
I was able to call my cell phone from my VoIP phone. Unfortunately, when I tried to call another external number, I got an error saying trial accounts can only call verified caller IDs. After creating an account on Twilio and adding some funds, I was able to call more external numbers.
Inbound Call Established
I was now able to have inbound calls arrive at my FreePBX server and to my VoIP phone.
Note
In order for inbound calls to be received, the server must be able to be reached over SIP port 5060 and over the RTP port range 10000-20000.
Completion
10/8/2024
This project was completed in about 12 days, starting from 9/26/2024. I have accomplished all the goals I envisioned for this project. I will continue to work on it by pursuing my post-project goals.
